Tip Sheet - Installing Handrail Bracket - Pulsar
Explore our range of modern railing systems including cable railing systems, glass railing systems, and stainless steel railings — perfect for indoor and outdoor applications.
Overview
These instructions will provide step-by-step installation guidelines for installing the Premium-grade stainless steel Handrail Wall Bracket Pulsar, HBWA.010 into sheetrock, wood, or drywall surfaces.
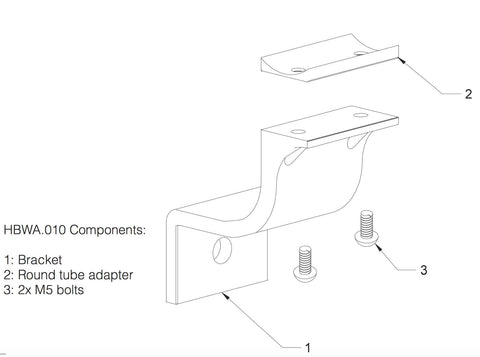
This bracket comes with a round saddle adapter to attach to round tubing and 2x M5 screws to attach to a handrail
Caution:Wear protective AISI approved safety glasses, working gloves and breathing mask all the times.
Tools Required
- Stud-finder
- Handheld drill
- 3/16” drill bit
- [Not Provided] 1x 3/8” mounting wall screw or bolt
Parts List:
Installation Instructions
-
Using a stud-finder, locate a stud and the vertical point on the wall that you wish to install your bracket (this point averages about 31” up from the nose of the step depending on your county code and comfort). Spot drill using 3/16” drill bit
-
Position bracket at desired orientation and use selected screw/bolt to mount and secure the bracket to the mounting surface
NOTE: If the bracket doesn’t align properly you can pound it out using a 1” rod from the bottom of the post. Be careful not to hit any of the tube threading while inserting the rod. Do this over a piece of cloth so that they bracket does not get scratched when it is pounded out.
Downloads:
TIP SHEET- INSTALLING Premium-grade stainless steel HANDRAILS
NOTE: A small amount of surface corrosion is not uncommon after some exposure to weather or salty conditions; we recommend using our passivation solution or a Premium-grade stainless steel polish to prevent surface corrosion; more information available on our Engineering Specs Page