

How to Install Frameless Glass Railing Standoffs (Glass Adapters)
This guide covers installing Inline Design round and square glass standoffs (also called glass adapters) for a frameless glass railing: a side-mounted glass panel held off a fascia, wall, or stair stringer with no posts. It applies to the round 30/40 mm standoff and the square 2" standoff. For the full parts list see the Frameless Glass Railing collection.
What is in the box
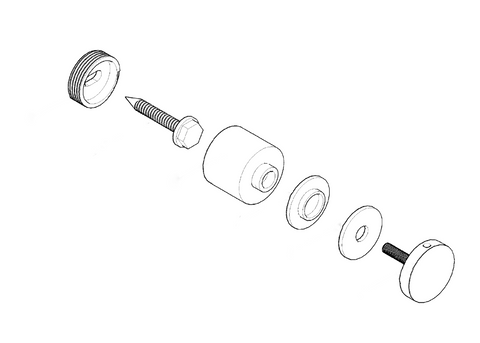
Each standoff comes with the mounting sleeve, the standoff column (30 mm or 40 mm on the round model), two round rubber gaskets, and the cap. The connection screw is sold separately so you can match it to your substrate: a 3/8" lag screw for wood framing, or a suitable anchor for concrete or steel.
Layout rules
- Space standoffs no more than 4 feet apart along the run, with at least two per panel edge. Panel size, glass thickness, wind and guard loads, and your local code set the final spacing.
- Holes in the glass are 1" in diameter. Give the glass fabricator the hole positions and edge distances from the standoff drawing before the glass is cut and tempered; holes cannot be drilled after tempering.
- Use tempered or laminated glass within the standoff's thickness range (1/4" to 3/4" for the round model, 3/8" to 1" for the square). For a frameless guard with no top rail, most codes call for laminated glass such as our 9/16" tempered laminated panel.
- Join adjacent panels with a panel stabilizer at every joint: middle stabilizers on straight runs, corner stabilizers where the run turns.
Caution: wear ANSI-approved safety glasses, work gloves, and a dust mask at all times. Glass panels are heavy; use two people and suction cups to set them.
Tools required
- Drill and the bit for your substrate
- 1/4" drill bit for spot drilling
- 3/8" lag screws or anchors suited to the mounting surface
- Level, tape measure, and glass suction cups
Installation steps
- Mark the standoff positions on the fascia or wall from your glass drawing, keeping every hole within the spacing and edge-distance limits above. Check the marks with a level.
- Spot drill each position with the 1/4" bit. For a 3/8" lag screw into wood, drill a pilot hole; concrete, masonry, and steel need the anchor and bit specified by the anchor manufacturer.
- Fasten only the mounting sleeve to the substrate with the appropriate screw or anchor.
- Twist the standoff column onto the sleeve.
- Fit the first rubber gasket onto the column, set the glass panel over the columns, then fit the second gasket.
- Place the cap and screw it down over the glass until the gaskets are compressed and the panel is firm. Do not over-tighten.
- Repeat for every standoff, then install the panel stabilizers at each joint and check the whole run for plumb.
Downloads
PDF installation instructions | Dimensional drawing and glass hole layout
NOTE: A small amount of surface corrosion is not uncommon after some exposure to weather or salty conditions; we recommend using our passivation solution to prevent surface corrosion; more information is available on our Tip Sheet on Passivation.