Installation Guidance - Glass Railing Posts with Glass Clamps
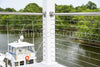
Explore our range of modern railing systems including cable railing systems, glass railing systems, and stainless steel railings — perfect for indoor and outdoor applications.
Overview
- These are instructions to install a railing post with glass clamps. The instructions are in two parts:
- Mounting glass clamps
- Mounting posts on a surface.
- This process requires at least two people to install safely.
- Do not order glass before the installation of your posts. The posts must be installed first to take the exact measurements for glass.
- The clamps are designed to fit by compression and do not require use of the safety pins, but Inline Design recommends their use.
- Discuss with your glass provider where to cut the glass panel to allow for use of the pins.
Caution: Wear protective AISI approved safety glasses, working gloves and breathing mask all the times.
Tools Required
Installing Clamps:
- 6mm hex wrench
- 4mm hex wrench
Installing Posts:
- Power drill
- Level
- Wrench
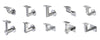
Parts:
- Posts Kits
- Glass clamps: square or round,
- Gaskets and accompanying accessories
Instructions
Part 1: Installing Glass Clamps
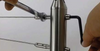
- Use a 4mm hex screw to disassemble your glass clamps so they are in two pieces.
- Position rubber gaskets (9.52mm for 3/8” glass; 12mm for 1/2” glass) into your glass clamps by pressing the protrusions of the gasket into the recesses of the glass clamp. Do this for each side

- Drop your M8 hardware into the oval shaped hole at the back of one of the glass clamp pieces.
- Attach the side of the glass clamp with the M8 hardware to your post using a 6mm hex wrench. Do not tighten all the way.
- The glass clamps will have a little room for up/down/left/right adjustment. Ensure that you adjust the glass clamps to line up before tightening. In the case of a middle post with four clamps, make sure the top and bottom clamps are lined up as long as the desired angle (90°, 135°, 180°). Do not attach the other half of the clamps until installing the glass.
- Repeat steps 1-5 with all the posts of your project.
Part 2: Mounting Posts
- Only if using base covers. Lift the base cover gently to have enough spec to work. Tape the base cover so it doesn’t fall down and is out of the way. Repeat for each step. and tape it so it doesn’t fall down and is out of the way. Apply the same to all the Posts. Skip this step if not using base covers.
- Adjust the post positions on your surface, ensure that all the posts line up correctly
- Mark your drilling points through the base of your posts.
- Remove the posts.
- Perform the guide/spot drilling for the bolts
- Put back the first post. Use a level on all sides to ensure the post is perfectly level.
- Use a wrench to tighten bolts to your surface.
Part 3: Measuring the Glass Panel
We recommend taking glass measurements after installing the posts and glass clamps for precise numbers.
- Measurements are taken from edge to edge of the clamps. We recommend taking 3/16” off from the overall length for clearance and tolerance.
- The diameter of holes drilled in the glass must be at least equal to the glass thickness. Hence, the glass will have some rooms to adjust on site.

- Please refer to the drawing below for the safety pins holes location.


Downloads:
NOTE: A small amount of surface corrosion is not uncommon after a some exposure to weather or salty conditions. We recommend using our passivation solution or some sort of stainless polish to keep any surf corrosion from happening